
Above: What they might look like using familiar Hindu-Arabic numeric glyphs. Note that this level of detail is too fine to 3D-print at 21mm in many print processes, though a resin printer should handle it fine.
Designing and 3D printing some gaming dice! Mainly as a way to familiarise myself with the processes and pitfalls of various 3D printing technogies.
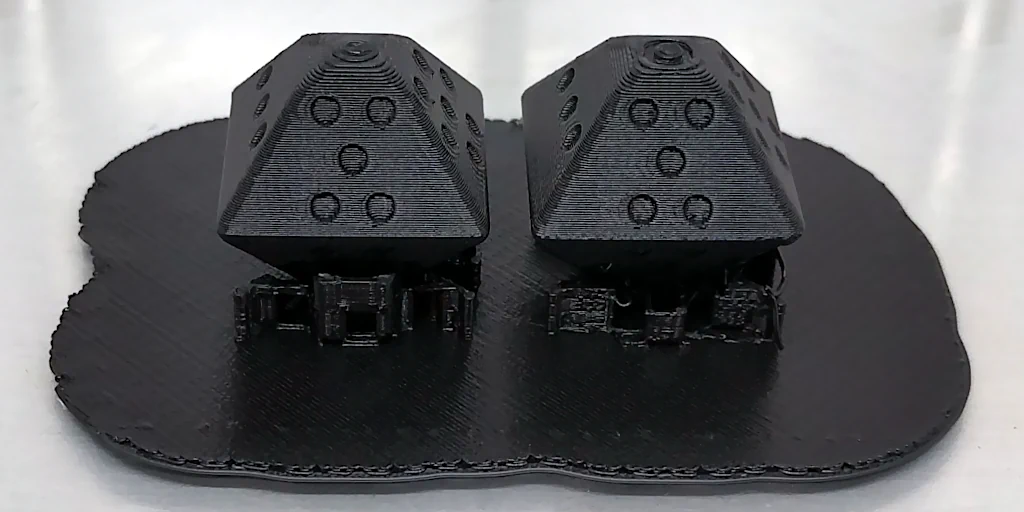
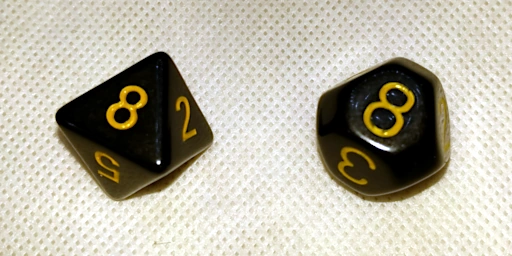
Since there is no real point in custom 3D printing something that I can buy much cheaper mass-produced, I went for something genuinely unique too: My dice are 8-sided and numbered zero (blank face) to seven, and in pairs, so you can roll 00-77 in octal (0-63 decimal equivalent). I rather like base-8 numerics, and my modified-octahedron came out both aestetically and dimensionally pleasing to me, and also 7 dots can be arranged in a way that is likewise aesthetically pleasing plus seems to bypass the normal human subitizing (sight-counting) limit.
I first generated an octahedron in Blender, using the (included but not default-enabled) add mesh: extra objects addon. Then I chopped of the 'top' and 'bottom' points for aesthetic reasons, and generally smoothed out the edges with a bevel filter. Next I generated a bunch of cylinders to subtract out of that mesh, generating the below 3D model (coloured for clarity).

Octahedrons are actually symetrical on all axis, but I found clipping back two of the points had a nice aesthetic, let the whole thing fit snugly inside an invisible cube (bounding box) with the truncated height the same as the width on the non-truncated side edges. I also found a further use for the flattened points: as I intended to use two dice together to form a two-digit pair, I needed to mark one of the dice to indicate it was the first digit of the pair. I cut out a circle on the top and bottom of one of the dice, in the truncated bit, to be this indicator:

So now you roll both dice and take the marked one as the upper digit and the unmarked one as the lower digit for an octal result of 00 to 77.
I am also quite happy with how the hexagonal pattern of dots came out. I also tried some other ways of arranging the dots, such as a more traditional 2x4 grid, but found it was very difficult to tell at-a-glance what the number is. The hexagonal arrangement seems to bypass the numeric part of the brain and instead tap into the linguistic center, treating the various patterns as glyphs to be read rather than numbers to be counted (completely non-expert hypothesis). Also the hexagons fit quite nicely into the equilateral-triangle-based faces of the octahedron. I shy away from using numeric digit glyphs (and likewise specific languages and alphabets) as I like to keep things culturally neutral and universally applicable when I can.
And here is the STL file for these two dice. I printed mine at 21.3mm high: 1/64th bigger than I wanted so I had a bit of room to sand-and-polish them back from the raw print output. You can print them at what ever size you like and your equimpent can handle. Tip: Use 100% infill as the mass (and center-of-mass) of dice is important for them to roll well/fairly.
Above: What they might look like using familiar Hindu-Arabic numeric glyphs. Note that this level of detail is too fine to 3D-print at 21mm in many print processes, though a resin printer should handle it fine.
Here are some PLA-plastic dice printed on an Ultimaker 2+ Connect, which is a fairly expensive filament printer, and it shows: The software is noticably better than the norm for the sector, and the printer itself is quite reliable (for this class of printer). I am generally pretty happy with it so far. My dice are still pushing the limits of this type of 3D-print technology, so are not brilliant, but are acceptable in the context of the sort of rapid prototyping that this class of device is good for.
Painted, they look... not great..., particularly the bottoms which suffered some distortion. I also had to clean up the bottom a bit with a hand-held rotary engraver to get it to work at all.

On to resin printing, with an AnyCubic MonoSE. The results at this much higher-resolution were beautiful! This print process lends itself to small high-detail parts.

The only significant down-side for this class of printer, as far as I have found sofar, is that the liquid resin is rather corrosive, and so the printer tray needs a lot of care and regular replacement of the plastic film in its base or (as I found) the resin leaks out and destroys the LCD beneath it, and those are both expensive and fiddly to replace (especially, after the particular printer model is out-of-production, which generally seems to happen after 6 months in this attention-defficit-driven industry). This is a well-known down-side to this class of consumer 3D printer.

I painted the dots. Green isn't a colour I use much, but I felt it looked rather nice on the frosted-transparent of the dice bodies. I also polished the right-side dice to be somewhat transparent. It doesn't look half-bad, but I actually prefer the frosted look of the one I didn't polish, but these are supposed to be samples so students can see all the possibilities and decide for themselves what is most suitable for their own projects, so having one of each is ideal.
....
I have played around with embedding objects inside cast-epoxy dice before, using some craft epoxy resin (which is formulated to not go slightly yellow like ordinary epoxy does) and some silicon dice molds I bought online. Quite successful, but I can't buy a ready-made mold for my own dice-design, of course. I have considered 3D printing some molds, but would need to find a print material that won't react with (stick to, or even be outright-disolved by!) epoxy resin (metal might be an option, but metal prints are not super-smooth on their surfaces). Why not 3D print them in clear resin like above? Well, the problem is that our 3D resin printer is a bottom-up type, which prints up-side-down. With a top-down printer, one could pause the print in the middle, insert the object, and resume the print, but gravity (and the need for the build-plate to squish up against the bottom of the resin tray for each layer) makes this impossible on the equipment available to me. I did request budget for a top-down DLP resin printer at work, but was (not unreasonably) denied because they start at 10x more expensive.
Then I had a big-brain moment.... Print the dice in two halves each, with a modeled-in cavity for the embedded object, then join them all together post-print. Of course!

I split both my dice models in half and re-positioned the parts.

Measuring my embeddable object, I determined I needed a spherical cavity of 12mm diameter inside my dice to comfortably fit it, so I generated the appropriate spherical volumes to subtract from my model.
But it was (naturally) a little trickier than that....
The problem was, that the hollows for the embedded object were, including the build plate while they were attached, sealed bubbles. And resin printing really doesn't like bubbles inside models (this is one area where filament printing generally wins out). I had encountered this issue a few days earlier when printing a student project and the resin had stuck inside a similar cavity during print, filling it, and hardening under UV-light from later layers printed below it. Of course, the 'bubble' isn't really sealed until its bottom layer is on, but the issue is that the build plate generally doesn't clear the top of the resin resivior during it's up-down motion while printing, so it doesn't matter - the open-bottomed cavity actually acts as a pump and sucks resin into itself during this motion!
So I poked around at the settings in my slicer (Chitubox), and lo-and-behold, there were settings to control the motion of the build plate during printing. So I set the build plate to raise well above the liquid resin after each layer, and also stay there a bit longer. This slowed the print down, but also gave the cavity opportunity to drain of liquid resin between each layer-print.

I had no idea if this would actually work, of course, but the worst that could happen is not getting the desired result on a small print-run, so no reason not to find out!

Above are my half-dice stuck under the resin-printer build-plate immediately after the print had finished.

Above are the dice-halves out of the printer and drying from their post-print wash in acetone (with a global isopropyl-alcohol shortage at the time, acetone is what I had: it works... if you are quick!). And the little green-and-white thing there is a cabbage! Not a real cabbage, but a wee little (around 12mm diameter) cabbage intended for putting in a doll-house garden or similar. I got a bag of 10 of them online quite cheap. They are made out of some sort of light ceramic, by the look/feel of them.
Why cabbages? During COVID-lockdown, I made several D&D characters just for fun after YouTube threw some D&D content my way (despite my not having played D&D since my teens when it was version 2!) One of them is a druid with a thing for cabbages!

Before pouring the unused resin from the printer's resivior tray back into the resin bottle, I scooped a little out and dropped it into each cavity in the middle of each dice-half. I also rolled my wee-cabbages around in the resin a bit so they would not have any air-bubbles attached to them. I pushed each cabbage into the cavity of one half-dice (being very very careful to get the right halves!) and then put a bit of extra resin on the surface of each dice-half to be joined together. Finally, I pressed the halves together (again, being extra extra careful to put the correct halves together, and facing the right way!) and lightly clamped them to hold the halves firmly together. After carefully wiping off the excess resin that oozed out the edges, I gave it a quick swish in my solvent (acetone) to make sure there was no liquid-resin stuck to the outside of the dice. Then into the UV curing station it all went for a few minutes. I then removed the clamps and did a few more minutes, to make absolutely sure the bits under the clamps were adequatedly irradiated.
The idea here is that the extra liquid resin in the cavity with the wee-cabbage, and also that in the join between the two dice-halves, will cure along with the rest of the dice, welding into a whole solid unit. Again, I was guessing, but this time I was fairly confident it would work.
")
And work it did!
As much as I preferred the frosted surface on my 'solid' resin-prints above, obviously these dice needed to be reasonably transparent so you could see what the green blobby thing inside them was!
So after a quick (and gentle) couple of swipes across some very-high-grit glass-paper for each face, I broke out the plastic-polisher, in my case Novus 3-stage plastic polish, which I have on hand to polish scratches out of acrylic (and recycled LCD screens). I gave a good hard rub of Number-2 (mildly gritty) to each face, the ends, and the edges: first with my polishing rag held on a hard flat surface, then again with a bit of padding behind it (I used my leg, since my jeans were going in the wash that evening anyway). Then a quick rinse in tap water, a dry, and a fresh bit of polishing-rag for a good hard rub with Number-1 (clear liquid) on hard then soft polishing surfaces. There is also a Number 3 (quite gritty) for particularly harsh scratches, but the high-grit glass-paper did that job instead.

Above, the left-side dice before polishing, right-side dice is polished. Quite a difference!

And finally, both polished, and the dots hand-painted. Green again, because cabbage!
While the engineering department here does have a metal 3D printer, they tend to have slightly more important things to do with it than print my silly dice! Instead I took my job to an external 3D printing house with metal-print capabilities. I chose stainless steel, which was a little more expensive than aluminium, mainly because I found a chemical 'blackening' process I was interested in trying out for that metal.
Note that this isn't at all cheap: Even something as small as these two dice, you are looking at around $20 in high-res plastic or up to $100 in metal (so I won't be setting up an Etsy store any time soon!). That cost was one I was willing to bare in this case as it produced some really nice (and tax-deductable for me) results and was also a professional learning task in itself. YMMV!
After some back-and-forth with the print-supplier to get my model within spec. for their printing process (my origional design had the holes a bit too close together and not deep enough to print well for this material), I got 4 dice pairs printed.
They came back from the 3D printer already quite usable without further embelishment:

Next, lets try some chemical processing, and plain old painting:
First pair, I lightly sanded their surfaces back (to make sure the surface was fully exposed to the chemicals I was about to apply) then dunked them in Caswell Stainless Steel Blackener for a few minutes, then washed the chemical off as per instructions. Then, one face per hour (so the paint wouldn't run as I turned the dice over), three times over, I hand-painted in the dots in a nice bright red modeling-paint:

Conversely, I also tried using a fine brush to apply the stainless steel blackener inside the dots with the outside left alone, washing it back out after about 3 minutes chemical-reaction-time as per instructions. I used a rotary engraver to remove the oxide layer from the metal inside the holes for the blackener to take properly, and then I had to sand and polish the surface for better contrast since the 'black' is not as good as black paint would be. In the end, more work than painting for a not-as-good effect, but you have to try these things to find out, and while not as good, it isn't actually bad:

Conclusion: The stainless steel blackener doesn't 'stick' to the surface as well as I had hoped, so tends to rub off, particularly on the edges which get the most wear during use. I am going to try sand-blasting a dice and re-blackening as the rougher surface from the sand-blast may hold the colour better. Stay tuned! I have also heard of a different chemical process (which gives more shiny-blue than black) which I am interested in trying too.
...
Well! Sand-blasting had an odd effect: it took off most of the black very easily (I hit the dice very breifly, not taking the paint out of the dots at all) but when I dunked the dice back in the stainless-steel blackener, it didn't react at all! No idea why, but the surface of the dice has obviously changed in some way. I could have sanded back the surface and re-blackened, but that would have just put me back where I started. In the end, I decided the (no-longer glossy, due to the sand-blasting) red dots looked quite good on the silver face, even the small amount of remaining black gave a nice distressed look, so I am keeping them like this, now:

While I was very happy with the print-output of my first run of dice, I made some minor changes to my model - a slight adjustment to dot size and placement as well as increasing the bevel on the sharper edges a litle bit. My print-supplier also suggested I round out the sharp inside-bottom edges of the dot holes to make printing a bit easier, and I suspect this will also improve paint-flow on dice I hand-paint in the dots too (in the painted sample of my dice-run above, you can see how the paint tended to pool more thickly around the bottom-edges of the dots due to the sharp angle's interaction with the wet paint's surface tension. With that sharp angle gone, I might even get away with only 2-coats instead of the 4 coats I had to do to (mostly) cover the inside-corner paint-pooling effect above!

For this version, I also 'cored' the model with a 2.5mm tunnel through from top to bottom: I already had a bunch of nice playing dice, so wanted to do something different for this run. So I am printing them at 50% size (so 10.5mm bounding box) and with the mentioned hole vertically through the middle. I also didn't make two-digit variations this time, just one dice model. While these can still be used perfectly-well as dice like this, these are intended to be dice-themed jewelery beads for a charm bracelet, necklace or similar.

Next up, when I find time - and a chemist to assist me with the frighteningly toxic chemicals involved in de-oxidising the pieces - I will try some of the heat-tempering colouration suggested by the print supplier. Will update here when I get some pics.
I had some aluminium prints done this time. As with the stainless steel and titanium ones, even fresh from the factory, they are very nice:

I had four pairs printed again. Less expensive than stainless steel or titanium, but at around $60 a pair, still not cheap, but worth it, I consider: the weight of this material feels very suitable for dice.

And above is a pair polished with a scotch-brite pad to remove the factory-oxide.

And now the dots are painted on one polished pair. I did one red and one black simply because for demo pieces it gives me more variety to demo.
...
I built myself a small bench-top anodizing setup to try dying the aluminium surface of my final two dice-pairs in a reasonably permonant way before (as usual) hand-painting in the dots.
 plain water. The jar heated unevenly and cracked, as they are not made for that!")
My setup was a block of wood with glass-jar-sized holes drilled in it, and a slat of undrilled wood across the bottom. This serves two functions: holding the pots of chemicals (some of which are mildly dangerous) securely, and insulating the dye and fixer pots to keep them warm for longer during their part of the process. Note I am not using the stove-top for heating - it is just a convenient surface to do the work on. The dye and fixer pots were heated in my microwave, after testing heating times to achieve the desired temperatures on jars of just tap-water. The yellow multimeter at the back-right has a temperature probe (first time I ever used that in 12 years!) to measure temperatures.

The anodizing itself is done with a bent aluminium cathode connected to the negative output of a 6V-2A power supply, while the dice is suspended in the anodizing acid by a bent piece of aluminium wire over a wooden stick. The wire clamping the dice is actually touching it inside two of the number holes on opposing faces, the intention being that the bits that don't get anodized (because they are under the wire-ends) will be under dot-paint when that is hand-applied anyway. In the next-below picture you can see a tiny white spot in the middle 7-dot on the left dice - that's where the wire was on that side.
....
Unfortunately this didn't work. A bit of research into the issue turned up that 3D-printed aluminium contains a high portion of silicon, which is necessary for the print process, but which also causes the anodysing process to fail completely.
So instead of developing a thin coating of aluminium oxide to take up a colour-dye, the aluminium surface went a dark grey colour, which won't take a dye... but actually looks pretty good in itself! And I know my anodizing process itself is good as a few scraps of sheet aluminium I also put through the process for testing did anodize and subsequently took up the dye-colour quite well.

So all-up, I am going to call this a success anyway, as this gets the nice permonant dark colour I was hoping to get with the stainless-steel blackener in dice that were a bit cheaper to print and have a more appropriate weight too! .... Now I just have to decide what colour to paint the dots!

I painted them red, since I was originally going to dye them red and paint the dots black.

And yellow, since I had an extra pair and the dark grey is so nice!
....
If I did want anodzaable aluminium dice, it looks like my two options would be:
1: Get them machined out of solid aluminium. Certainly possible, but would be even more expensive than 3D printing in aluminium (by a lot!), and I would almost certainly have to re-do the model as a proper CAD file rather than a 3D-mesh model for the CNC machine doing the work.
2: Have some casting molds 3D-printed and pour-cast the dice. (I almost took this approach for epoxy-casting my embedded-in-resin dice above but then thought up the way described to do it with a direct 3D-resin-print instead).
3D printing, particularly at professional quality, is fiddly and expensive. As a much cheaper and simpler approach, particularly good at the game-design prototyping stage, doing something by hand may be more effective.
Here I used a rotary hand engraver to crudely make my dice set out of octahedral blanks I bought for a few dollars online (other common dice shapes such as D4, D6, D10, D12, D20 also available). You could even just write-on the faces with a permonant marker, but by engraving in the holes, and then colouring in those holes with a marker pen, I get something a bit more wear-resistant. This one was done at home during COVID lockdown, so is a bit rough: with a small drill press and an X-Y-adjustable bed-clamp, I could do a much neater job with the holes properly aligned, but even this crude job is a good example for if you just want to quickly make up some custom dice for play-testing an idea.

More to come: We recently got a CO2 laser cutter/engraver in our maker space, and once I get the CNC machine assembled and working, I intend also making a set of trays that will let me burn nice elaborate dice-face graphics onto such plastic blanks off a template that students can use to design their own faces into. (One face per run, manually turning the dice between, so no D20's please!)
So... what to do with a pair of 8-sided dice that count 0-7 each or 00-77 together? Well, a tabletop-role-playing-game is an obvious use! You could simply modify one of the open-source "D100" systems, which use two 10-sided dice to roll 00-99 in decimal, to instead use 00-77 in octal (base-8), for example.
Of course I made one .... But it is a very rough early draft with many bits still missing and completely un-play-tested - I didn't follow my own advice and modify an existing D100 system and instead worked it up from scratch, so it is really badly play-balanced right now! Though I have some interesting game-mechanics that I am quite proud of (assuming they survive an actual play-test!) Stay tuned, I will slowly pick at it and improve it as my interest and free time allows, and eventually (months to years off, I expect, sorry!) post it here.
Current status: Character creation is pretty-much good-to-go. Actual gameplay is work-in-progress, particularly combat mechanics which is a complete mess! Some (as far as I know) unique mechanics beyond the octal dice gimmick, too. Whether those are good ideas or not is still to be tested! Not quite ready for play-testing with some work-colleagues yet, but I think I am getting quite close. I have a unique fantasy-wrapped sci-fi game-setting I am rather happy with! Needs a lot of filling-out of equipment, magic, creatures, of course!
One day I'll finish it enough to relase. Probably under the ORC licence: I am not interested in commercialisation of my game, but do wish to retain IP rights while not resstricting usage in the (unlikely) event anyone wants to use it.
Formally, dice is singular or plural. Plural is not dices, though I doubt anyone would mis-understand you if you said it, so I wouldn't worry too much about that! Die is an archaic but still accepted form for the singular. I use the archaic version in some of my headings above mainly for homographic humour.
There is a convention to the way numbers are put on faces of a dice. That convention is that all opposing faces should add up to the same number. So for a standard 6-sided dice, the opposing faces are 1:6 2:5 3:4, all adding to 7. On my 8-sided dice, the opposing faces are 0:7 1:6 2:5 3:4, also all adding up to 7 (because I am counting from zero... both happening to add to 7 is coincidence: nothing special about the number 7 here!). On a 20-sided dice, 1:20 2:19 3:18 etc. all adding to 21. For dice without opposing faces, such as tetrahedrons or some of the wacky odd-number-faced dice from my sample bag, this system is out the window and you probably should just do your best to disperse the numbers around as far from their numeric-sequence neighbors as possible.
For non-numeric dice, there are no real rules, but you probably should again think about what may constitute an 'opposite' in the context of your game and go with that. One example (or counter-example, since it is sort-of the opposite of what I just said!) is 'Fate™' or 'fudge' dice which are 6-sided dice configured effectively as 3-sided dice, as there are two faces with a + symbol, two with a - symbol and two with no symbol. These dice just have the same symbol on opposing faces.

Roll big handfulls of these (fun in itself) and add one for each plus and subtract one for each minus (and zero for blank, of course) to get your result - it has a distinctly different probability-distribution of the final number compared to more traditional dice techniques: With numbered dice, each result (face) has the same probability, while with fate/fudge dice rolls, results towards the middle of the possible range have a much higher probability than results at the extremes, as more combinations of rolls will get midling results while at the extremes you have to get mostly/exclusively + or - results on all die, so there are less combinations available to give these results.
Here is a bunch of other non-numeric dice from my demo/sample collection:
appropriate moments!")
Top Row: constellations, planets, colours, shapes, rock-paper-scissors, I-Ching, seafood (actually, from a form of Mahjong, I believe).
Bottom Row: emotes, weather, direction, terrain, dungeon-interor, furniature, treasure. (Some of these bottom row might be used for on-the-fly random situation/environment/map/reward generation in a tabletop role-playing game - you can use standard numeric dice and a look-up table for this, of course, but special dice can be fun in themselves!)
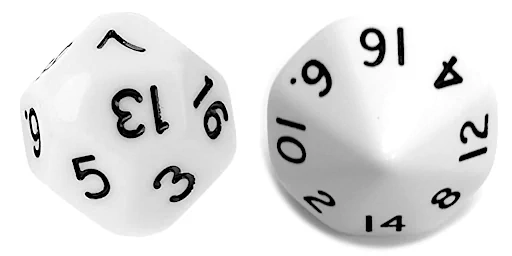
There is another possible arrangement in use, mainly with larger-sided dice such as D20s. It is called a 'spindown' arrangement, or the dice themselves 'spindown dice'. In this arrangement, the numbers are as close to adjacent as possible, like this:
Notice how the numbers are in a sequential order, as much as geometry allows, rather than 'scattered' about. This makes it easier to use the dice as a number-counting device, where the player turns the dice up (or down) a single number amount to keep track of a running score or similar, rather than rolling the dice to generate numbers. The dice can still also be used as a number-generator at other times in the game or in other games, of course.
There is some argument regarding the 'fairness' of this numeric arrangement. Generally, if the dice are evenly weighted, and are rolled modestly hard, it should not make a difference, but if the dice are not well-made or rolled properly then the odds of a particular group of faces coming up more often can be affected. For normal fun gameplay this is not going to be a issue worth worrying about, but people serious about 'fairness' of dice rolls do have some grounding for their argument, as outside of very-carefully-made and equally-very-expensive casino dice, it is unlikely you will be using dice that are perfectly-weighted. Still, the difference in odds are going to be quite small, provided the dice is rolled hard enough to do three-or-four full revolutions before it settles.
Shape is also important: Below are two different designs of 16-sided dice. The left one has sides of slightly different shape and angle between faces, which means it is not going to be truly 'fair' (though it will be close enough for most purposes). The right dice uses an octagonal trapezohedron design (as per the pentagonal trapezohedron used for TTRPG 10-sided dice) and is far better for ensuring reliable randomness, at the cost of sharp angles that make the physical roll a little awkward.
100-sided dice have the same issue. I did get one amongst the two multi-dice sets I purchased to get my big variety of numeric-dice samples, but I removed it from my collection because it was bulky, difficult to determine which face was most-up, and I don't care much for numeric base-10 anyway! I wouldn't make myself a 64-sided dice for the (first two) same reasons, and my dual-8 dice set performs exactly the same function anyway.
The platonic solids are obvious good choices for dice shape as they are very regular, providing 4, 6, 8, 12 and 20 sides identical in size, shape and angles between. There are a number of other semi-regular solids with identicaly-shaped sides though the faces themselves are not regular, and the angles between them differ, though in consistent ways, so the dice can probably still be considered 'fair'. These are usually constructed by further triange-dividing the faces of the platonic solids, providing face counts such as 12, 24, 24, 30 and 60 (repeats there are deliberate - there are multiple ways to get some of those side counts).
I have also seen a 'fair' 120-sided one online, but have never found one I could buy cheaply.
The 4-sided dice is an interesting one to consider separately too, as the tetrahedron (below, left) is often used but rolls really poorly due to its sharp angles and low center-of-mass:
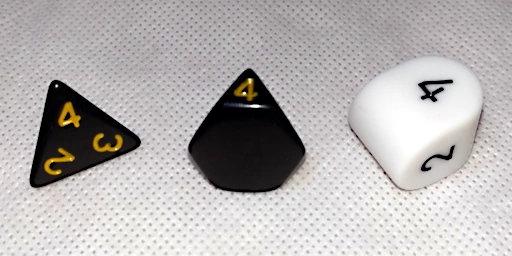
Above center is a tetrahedron with the corners rounded off for better roll, which also gives you an up-facing surface to put the numbers on. And above right is an entirely different approach to a 4-sided dice. ... you could also make a D4 by doubling up numbers on a D8 (or trippling on a D12, quintupling on a D20!)
Similarly, above are two D8s. Left is the more conventional sharp octahedron, and right is one with rounded corners (I got this one after I had shaved the tops off my own D8 design. After getting this dice, I played around with taking off my edge corners, but because my dot pattern only has two-axis symetry on some faces, and shaving all the corners lends itself to three-axis symetry, I decided to stick with dice with a definite 'top/bottom'. A purely personal-aesthetic decision).

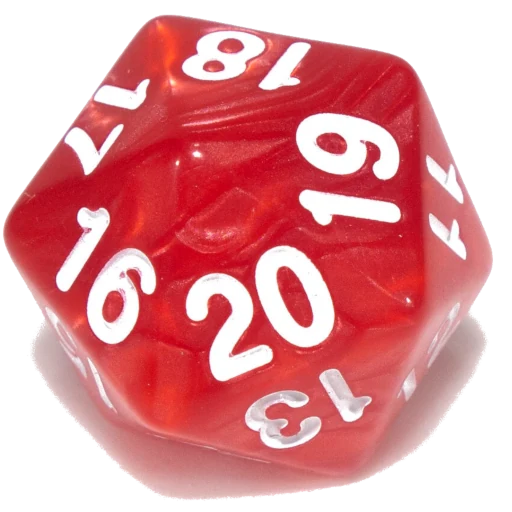
Above are some assorted 'weird' dice, (yes, I consider D10s 'weird'). The D10's, being pentagonal trapezohedron in shape, are 'fair' (if a little pointy) as is the D3 made from a D6 with numbers I II and III doubled-up on opposite sides. The D7, D5 and D16 are not strictly 'fair' for reasons discussed above, but are close enough for just having fun with! A truly 'fair' D5 couid be made by quadrupling-up numbers on a D20. You could also make a 'rounder' D10 by doubling up numbers on a D20. The only way to get a 'fair' D7 would be to double up numbers on a 14-sided heptagonal trapezohedron, though.
Odd-number-side dice might be useful if you want rolls, for example, from -3 to 3, including zero, as this would require 7 faces. The Fudge (Fate™) dice mentioned above also use (effective) 3-side dice for -1,0,1 results on each dice.
Meanwhile, over in videoland, popular TTRPG YouTuber Ginny Di also has her own collection of wierd dice.
Weighted Dice, or Loaded Dice are also possible. This is usually used for altering the odds of rolls for the purposes of cheating. They are made by burying a weight just under one side of the dice, which will increase the chances of the opposite side being on top when the dice settles.
Loading the corner of a dice can also be done, and with careful practice such dice can be thrown in a particular way to achieve desired results even more often.
If the dice is made of a material that is light enough to float in water, it is pretty easy to test for this as loaded dice will float weighted-side-down and you won't be able to tip them in any other direction while they are floating (liquids with higher density than water can be used to test heavier dice, but most dice are wood or plastic, so can be water-tested). Casinos usually use transparent dice in order to make it easier to detect dice-tampering from simple visual inspection.
 Glenn's home page.