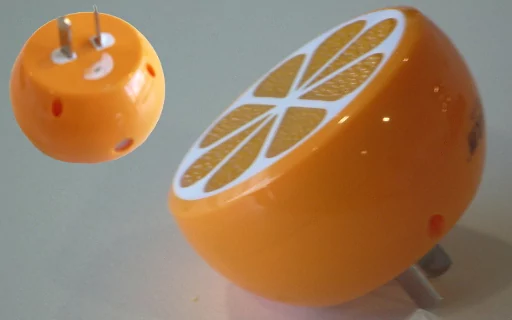
The Bright Orange
I found this cute little sliced-orange night-light on the internet. In its original form it just has 3 internal LEDs that light the whole thing up. I can certainly do better! :-)
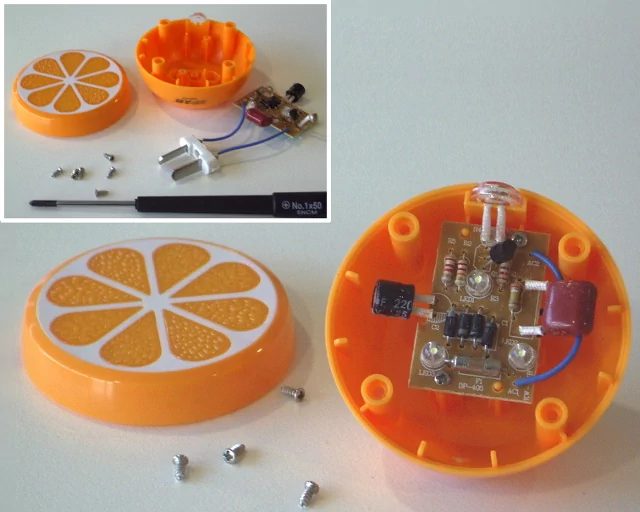
Out with the old!
I dis-assembled the unit and stripped out all the original mains-rated stuff.
Wedges
My intention was to light each segment of the orange individually. Part of this required a way to not light adjacent segments to the one being lit. To achieve this, I created 8 wedge-shaped light boxes from clear perspex:
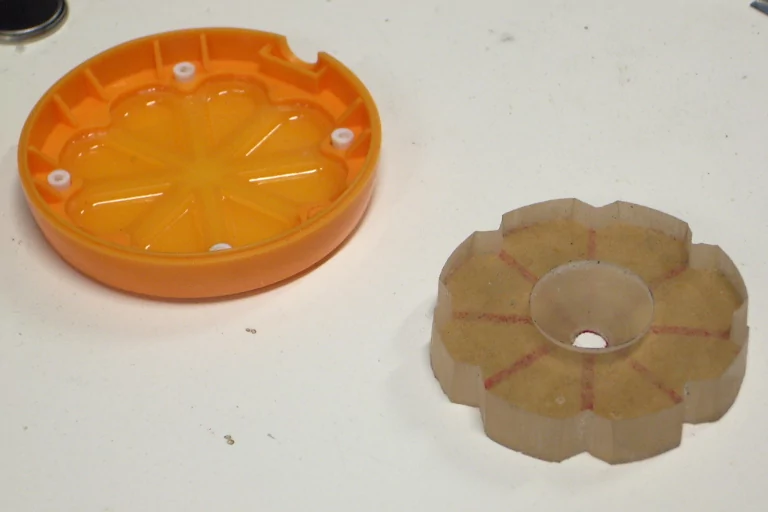
covering the sides and top of each wedge with aluminium foil, glued on with epoxy resin:

Finally the foiled wedges were glued back into a disk.
LED lighting.
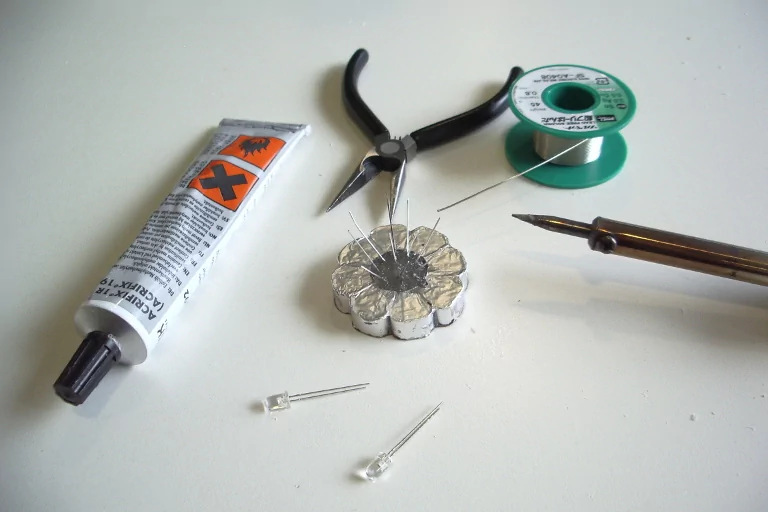
Next, I carefully drilled 5mm holes out of the inside sloped edges of the wedges and inserted ultra-bright orange LEDs in each hole, with a dab of acrifix in each to hold them firm. I soldered the common leads of the LEDs together to a single lead (centre) with the other ends exiting the disk around it. A big glob of acrifix on top to set into solid acrylic overnight:
Then, I sanded the transparent side of the light unit flat.

Finally, I soldered on 150 ohm resistors and a common wire, with another blob of acrifix (and some plastic shavings) to hold it all secure:

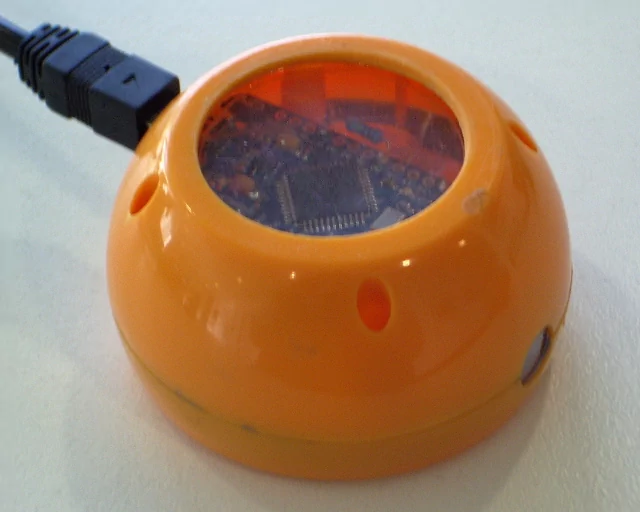
Micro-control
An Arduino Pro-Micro (Leonardo compatible) was epoxy glued to a piece of scrap perspex which had been acrifixed over the resistors. Then I wired all the resistor-ends to the arduino digital pins 2 through 9:

Oh Bugger! I had been testing the LEDs in the light-wedges with a button cell and forgot that + was the case side of the battery, so all my LEDs had the wrong terminal wired to common. Luckily, by wiring the common to VCC instead of GND, it still works (common anode), at the expense of having to remember to use HIGH for off and LOW for on in the arduino coding (the other way around is convention, but the arduino itself doesn't actually care).
Optional Extras
The Arduino Pro-Micro still has a few spare pads, so I am cramming extra functions in that I may-or-may-not use.
I de-soldered the LDR from the origional board and added it, along with a 1M ohm balance resistor to analog input A0. If I want to, I can now sense light levels around the device. I also put a small piece of black cardboard behind the LDR to keep stray internal light off it:

I ordered a mobile phone earpiece speaker (tiny but loud) to connect up to digital output 10. I then programmed a startup sound (a few bars of Orange Crush by REM [Used under copyright fair-use academic provisions] - Thanks Mark R. for the transcription). Also added assorted appropriate beeps to the loop effects.

You can also see, above, that I painted some silver paint over the inside to try and reduce light-splash even further.
Finally, I drilled out the back with a circle-saw and glued in a perspex disk. This was both because the base had the ugly holes left over from removing the mains pins and also because, as a student demo project, I wanted to be able to see inside without always unscrewing the back.
Code
For the Arduino code, I programmed in a bunch of short subroutines that flash and cycle the LEDs in different patterns. The routine names are fairly self-explanatory. Some have extra variables, so far to determine the number of repeats to do, where it is appropriate :
//Leonardo/Pro-Micro
// due to a brain-lapse, LEDS were wired backwards and
// common had to be connected to VCC instead of GND
// As a result LOW is ON and HIGH is OFF below
#include "pitches.h" // from the Arduino digital-tone examples
int count = 2; // loop counter
int iterations; // repeat counter
// the setup routine runs once when you press reset:
void setup() {
// initialize the digital pins as an output.
for(count = 2; count <10; count++)
pinMode(count, OUTPUT);
playREM(0); // 0 = play the whole intro tune
}
// the loop routine runs over and over again forever:
void loop() {
all_off();
single_random(64);
multi_random(64);
all_off();
single_CCW(4);
single_CW(4);
single_CCW(1);
single_CW(1);
single_CCW(1);
single_CW(1);
dual_CW(8);
all_off();
dual_CCW(8);
all_off();
fill_CW();
empty_CW();
fill_CW();
empty_CW();
fill_CW();
empty_CW();
fill_CW();
empty_CW();
fill_CCW();
empty_CCW();
fill_CCW();
empty_CCW();
fill_CCW();
empty_CCW();
fill_CCW();
empty_CCW();
all_on();
all_off();
all_on();
all_off();
all_on();
all_off();
all_on();
all_off();
delay(500);
playREM(1); // 1 = just the main bit this time
}
void single_CW(int loops) {
for(iterations=0;iterations < loops;iterations++) {
for(count=2;count<10;count++) {
if(count==2) digitalWrite(9, HIGH);
else digitalWrite(count-1, HIGH); // turn the previous LED off
digitalWrite(count, LOW); // turn the next LED on
tone(10,1000,10);
delay(100); // wait for 1/10 second
}
}
}
void single_CCW(int loops) {
for(iterations=0;iterations < loops;iterations++) {
for(count=9;count>1;count--) {
if(count==9) digitalWrite(2, HIGH);
else digitalWrite(count+1, HIGH);
digitalWrite(count, LOW);
tone(10,1000,10);
delay(100);
}
}
}
void dual_CW(int loops) {
for(iterations=0;iterations < loops;iterations++) {
for(count=2;count<6;count++) {
if(count==2) {
digitalWrite(9, HIGH);
digitalWrite(5, HIGH);
}
else {
digitalWrite(count-1, HIGH);
digitalWrite(count+3, HIGH);
}
digitalWrite(count, LOW);
digitalWrite(count+4, LOW);
tone(10,count*100);
delay(100);
}
}
noTone(10);
}
void dual_CCW(int loops) {
for(iterations=0;iterations < loops;iterations++) {
for(count=5;count>1;count--) {
if(count==5) {
digitalWrite(2, HIGH);
digitalWrite(6, HIGH);
}
else {
digitalWrite(count+1, HIGH);
digitalWrite(count+5, HIGH);
}
digitalWrite(count, LOW);
digitalWrite(count+4, LOW);
tone(10,count*100);
delay(100);
}
}
noTone(10);
}
void fill_CW() {
for(count=2;count < 10;count++) {
digitalWrite(count, LOW);
delay(100);
tone(10,count*500);
}
noTone(10);
}
void fill_CCW() {
for(count=9;count > 1;count--) {
digitalWrite(count, LOW);
delay(100);
tone(10,5500-count*500);
}
noTone(10);
}
void empty_CW() {
for(count=2;count < 10;count++) {
digitalWrite(count, HIGH);
delay(100);
tone(10,5500-count*500);
}
noTone(10);
}
void empty_CCW() {
for(count=9;count > 1;count--) {
digitalWrite(count, HIGH);
delay(100);
tone(10,count*500);
}
noTone(10);
}
void all_on() {
for(count=9;count > 1;count--) {
digitalWrite(count, LOW);
}
tone(10,2000);
delay(400);
noTone(10);
}
void all_off() {
for(count=9;count > 1;count--) {
digitalWrite(count, HIGH);
}
noTone(10);
delay(400);
}
void single_random(int loops) {
for(iterations=0;iterations < loops;iterations++) {
int current = (int) random(2,9);
digitalWrite(current, LOW); // turn it on
delay(100); // wait for 1/10 second
digitalWrite(current, HIGH); //turn it off
tone(10, (int) random(1000,2000));
}
noTone(10);
}
void multi_random(int loops) {
for(iterations=0;iterations < loops;iterations++) {
int current = (int) random(2,9);
digitalWrite(current, LOW); // turn one on
delay(50); // wait for 1/10 second
current = (int) random(2,9);
digitalWrite(current, HIGH); //turn one off
delay(50); // wait for 1/10 second
tone(10, (int) random(500,1000));
}
noTone(10);
}
void playREM(int length) // 0 = full intro, 1 = second half only {
// REM - Orange Crush :-P
int melody[] = { NOTE_B3, NOTE_B3, NOTE_B3, NOTE_D4, NOTE_E4, NOTE_D4, NOTE_B3,
NOTE_G3, NOTE_G3, NOTE_G3, NOTE_D3, NOTE_FS3, NOTE_FS3, NOTE_G3, NOTE_FS3, NOTE_E3};
// note durations: 4 = quarter note, 8 = eighth note, etc.:
int noteDurations[] = {8, 4, 3, 4, 4, 8, 2,
4, 4, 4, 4, 4, 4, 6, 4, 4};
for (int thisNote = length*7; thisNote < 16; thisNote++) {
// to calculate the note duration, take one second
// divided by the note type.
//e.g. quarter note = 1000 / 4, eighth note = 1000/8, etc.
int noteDuration = 1000/noteDurations[thisNote];
tone(10, melody[thisNote],noteDuration);
// to distinguish the notes, set a minimum time between them.
// the note's duration + 30% seems to work well:
int pauseBetweenNotes = noteDuration * 1.30;
delay(pauseBetweenNotes);
// stop the tone playing:
noTone(10);
}
}
And here it is in action:
[REM "Orange Crush" used under copyright fair-use academic provisions]
 Glenn's home page.
